Today's shot for the "Photo a Day" project is called Abstract Macro #2. Can you tell what it is?
Exif Data
Camera: Canon 5D mkII
Aperture: f/8.0
Exposure: 1/200
Focal Length: 50mm
Extension Tubes: 68mm
Flash: Not-Fired
ISO: 100
Post processing included conversion from RAW, levels adjustment, colour adjustment, and unsharp-mask
Welcome
Welcome to my photoblog. I try to keep it updated daily with a new photo from either my personal or professional life. It is not intended to be taken as my professional portfolio (please visit the main website for that), but instead it is more of an informal and fun way for me to share some of my personality and creativity with you. Many of the photos on my blog are available for purchase as fine art prints, please visit the main website and/or contact me if you are interested. Enjoy!
Monday, February 28, 2011
Sunday, February 27, 2011
Butterfly
Saturday, February 26, 2011
1st Birthday!
Friday, February 25, 2011
Wedding - Laura & Jason
Laura and Jason tied the knot at the Strathmere Lodge on February 25th. It was a beautiful ceremony with fantastic and colourful lighting throughout the room. A big congrats to you both! Here are a few of the shots I got.
Wedding Centerpiece
Thursday, February 24, 2011
Abstract Macro
Today's shot for the "Photo a Day" project is called Abstract Macro
Exif Data
Camera: Canon 5D mkII
Aperture: f/1.8
Exposure: 1/200
Focal Length: 50mm
Extension Tubes: 68mm
Multiple Flashes: Fired E-TTL (Ratio 1:4)
ISO: 500
Purple Gel on flash
Post processing included conversion from RAW, levels adjustment, and unsharp-mask
Exif Data
Camera: Canon 5D mkII
Aperture: f/1.8
Exposure: 1/200
Focal Length: 50mm
Extension Tubes: 68mm
Multiple Flashes: Fired E-TTL (Ratio 1:4)
ISO: 500
Purple Gel on flash
Post processing included conversion from RAW, levels adjustment, and unsharp-mask
Wednesday, February 23, 2011
Morning Tea
Tuesday, February 22, 2011
My Heart
Monday, February 21, 2011
Ribbit
Sunday, February 20, 2011
Daisy Droplets
There are two shot for the "Photo a Day" project today and they are called Daisy Droplets
Exif Data
Camera: Canon 5D mkII
Aperture: f/14.0 & f/9.0
Exposure: 1/125 & 1/100
Focal Length: 50mm
Extension Tubes: 68mm
Multiple Flashes: Fired E-TTL (Ratio 1:2)
ISO: 320
Post processing included conversion from RAW, and unsharp-mask
Exif Data
Camera: Canon 5D mkII
Aperture: f/14.0 & f/9.0
Exposure: 1/125 & 1/100
Focal Length: 50mm
Extension Tubes: 68mm
Multiple Flashes: Fired E-TTL (Ratio 1:2)
ISO: 320
Post processing included conversion from RAW, and unsharp-mask
Friday, February 18, 2011
Fountain Pen
Today's shot for the "Photo a Day" project is called Fountain Pen
Exif Data
Camera: Canon 5D mkII
Aperture: f/6.3
Exposure: 1/100
Focal Length: 50mm
Extension Tubes: 68mm
Mutliple Flashes: Fired E-TTL (Ratio 1:2)
Flash Bias: -1/3EV
ISO: 400
Post processing included conversion from RAW, cropped, and unsharp-mask
Exif Data
Camera: Canon 5D mkII
Aperture: f/6.3
Exposure: 1/100
Focal Length: 50mm
Extension Tubes: 68mm
Mutliple Flashes: Fired E-TTL (Ratio 1:2)
Flash Bias: -1/3EV
ISO: 400
Post processing included conversion from RAW, cropped, and unsharp-mask
Thursday, February 17, 2011
Ansco Ready-Set Vintage Bellows Camera
Today's shot for the "Photo a Day" project is called Ansco Ready-Set Vintage Bellows Camera. It is the oldest camera I have (circa 1925-32 approx.) yet I am sure it still works. Unfortunately, I do not have any film for it!
Exif Data
Camera: Canon 5D mkII
Aperture: f/11.0
Exposure: 1/80
Focal Length: 70mm
Multiple Flashes: Fired E-TTL (Ratio 1:2)
Flash Bias: -1EV
ISO: 400
Post processing included conversion from RAW, cropped, contrast adjustment, convert to black and white, and overlay texture
Exif Data
Camera: Canon 5D mkII
Aperture: f/11.0
Exposure: 1/80
Focal Length: 70mm
Multiple Flashes: Fired E-TTL (Ratio 1:2)
Flash Bias: -1EV
ISO: 400
Post processing included conversion from RAW, cropped, contrast adjustment, convert to black and white, and overlay texture
Wednesday, February 16, 2011
Portrait - Sammy
Today's shot for the "Photo a Day" project is a portrait of Sammy. We had a great little portrait session yesterday and I thought this one was my favourite.
Exif Data
Camera: Canon 5D mkII
Aperture: f/4.0
Exposure: 1/80
Focal Length: 50mm
Multiple Flashes: Fired E-TTL (Ratio 1:2.8)
ISO: 400
Umbrella
Reflector
Post processing included conversino from RAW, levels adjustment, and cropped
Exif Data
Camera: Canon 5D mkII
Aperture: f/4.0
Exposure: 1/80
Focal Length: 50mm
Multiple Flashes: Fired E-TTL (Ratio 1:2.8)
ISO: 400
Umbrella
Reflector
Post processing included conversino from RAW, levels adjustment, and cropped
Tuesday, February 15, 2011
Valentines Day Flower
Today's shot for the "Photo a Day" project is called Valentines Day Flower
Exif Data
Camera: Canon 5D mkII
Aperture: f/7.1
Exposure: 1/100
Focal Length: 50mm
Extension Tube: 36mm
Multiple Flashes: Fired E-TTL (Ratio 1:2)
ISO: 160
Umbrella
Post processing included conversion from RAW, levels adjustment, and unsharp-mask
Exif Data
Camera: Canon 5D mkII
Aperture: f/7.1
Exposure: 1/100
Focal Length: 50mm
Extension Tube: 36mm
Multiple Flashes: Fired E-TTL (Ratio 1:2)
ISO: 160
Umbrella
Post processing included conversion from RAW, levels adjustment, and unsharp-mask
Monday, February 14, 2011
Raindrops
Sunday, February 13, 2011
adidas fragrence for men
Today's shot for the "Photo a Day" project is called adidas fragrence for men
Exif Data
Camera: Canon 5D mkII
Aperture: f/5.6
Exposure: 1/80
Focal Length: 50mm
Multiple Flashes: Fired E-TTL (Ratio 1:2)
ISO: 500
Lightbox
Post processing included conversion from RAW with adjustment brush strokes, healing tool, and unsharp-mask
Exif Data
Camera: Canon 5D mkII
Aperture: f/5.6
Exposure: 1/80
Focal Length: 50mm
Multiple Flashes: Fired E-TTL (Ratio 1:2)
ISO: 500
Lightbox
Post processing included conversion from RAW with adjustment brush strokes, healing tool, and unsharp-mask
Saturday, February 12, 2011
Winterlude 2011 - Fish Out Of Water Sculpture
Today's shot for the "Photo a Day" project is called Fish Out Of Water Sculpture. It was taken with the help of my good friend Jeff, over at Jeffrey Meyer Photography.
Exif Data
Camera: Canon 5D mkII
Aperture: f/5.6
Exposure: 1/20
Focal Length: 28mm
Multiple Flashes: Fired E-TTL (Ratio 1:5.6)
ISO: 500
Post processing included conversion from RAW, levels adjustment, cropped, and unsharp-mask
Exif Data
Camera: Canon 5D mkII
Aperture: f/5.6
Exposure: 1/20
Focal Length: 28mm
Multiple Flashes: Fired E-TTL (Ratio 1:5.6)
ISO: 500
Post processing included conversion from RAW, levels adjustment, cropped, and unsharp-mask
Friday, February 11, 2011
Sunset In The Valley
Thursday, February 10, 2011
Frosted Fence
Wednesday, February 9, 2011
Winterlude 2011 - Samurai Ice Sculpture
Today's shot for the "Photo a Day" project is called Samurai Ice Sculpture. It was taken with the help of my good friend Jeff, over at Jeffrey Meyer Photography.
Exif Data
Camera: Canon 5D mkII
Aperture: f/5.6
Exposure: 1/30
Focal Length: 47mm
Multiple Flashes: Fired E-TTL (Ratio 1:5.6)
ISO: 500
Post processing included conversion from RAW, levels adjustment, and unsharp-mask
Exif Data
Camera: Canon 5D mkII
Aperture: f/5.6
Exposure: 1/30
Focal Length: 47mm
Multiple Flashes: Fired E-TTL (Ratio 1:5.6)
ISO: 500
Post processing included conversion from RAW, levels adjustment, and unsharp-mask
Tuesday, February 8, 2011
Winterlude 2011 - Snowball Fight
Today's shot for the "Photo a Day" project is called Snowball Fight. It was taken with the help of my good friend Jeff, over at Jeffrey Meyer Photography.
Exif Data
Camera: Canon 5D mkII
Aperture: f/5.6
Exposure: 1/20
Focal Length: 82mm
Multiple Flashes: Fired E-TTL (Ratio 1:5.6)
ISO: 500
Post processing included
Exif Data
Camera: Canon 5D mkII
Aperture: f/5.6
Exposure: 1/20
Focal Length: 82mm
Multiple Flashes: Fired E-TTL (Ratio 1:5.6)
ISO: 500
Post processing included
Monday, February 7, 2011
Winterlude 2011 - Fire and Ice
Sunday, February 6, 2011
Museum of Civilization
How I Did It: Self Portrait Droste Style - Tutorial
I had a few people ask me how I made my Self Portrait Droste Style a few days ago, so I thought I would write a quick little tutorial.
The Droste effect is a special plugin for Photoshop. There may also be plugins for free programs such as Gimp, however since I used Photoshop to make mine, so this tutorial will only show you the way to do it using this method. Obviously, Photoshop CS4 or CS5 is required to use this tutorial. You will also need the free Adobe Pixel Bender Plug-in and the free Droste Effect add-on for pixel bender. Install the pixel bender plug-in as usual, and just unzip the Droste effect add-on .pbk file into your Program Files\Adobe\Adobe Photoshop CS5\Pixel Bender Files\ folder (for 64bit windows use Program Files\Adobe\Adobe Photoshop CS5 (64 bit)\Pixel Bender Files\).
Now that we have everything ready to go to edit your file, what we need now is a self portrait.
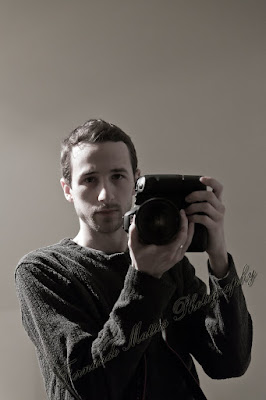
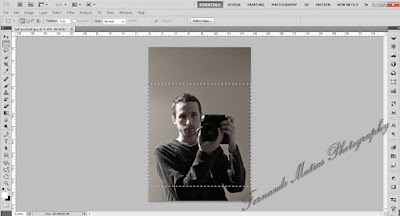
Great! Now that we have a shot we want to use, we load it up in Photoshop and the first thing we do is make a perfect square (hold shift) over the area we would like to use with the marquee tool, and copy the selection (ctrl-c).
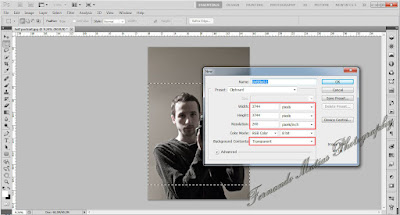
We then create a new transparent background document, using the exact dimensions of the squared selection. In my case those values were 3744 x 3744px at 240dpi.
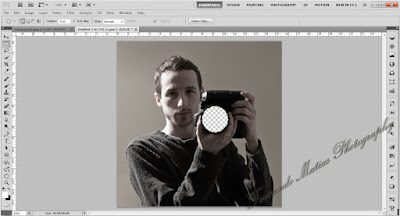
We then paste our copied selection into our new document (ctrl-p), and in this case I wanted the Droste effect to come from the inside portion of my camera lens so using the circular marquee tool I cut out the inside of my lens revealing the transparent background.
We can now go ahead and load up the Droste plugin filter (Filter/Pixel Bender/Pixel Bender Gallery). After selecting Droste from the drop down menu, the first thing we have to do is set the size to the same dimensions as our file (3744x3744).
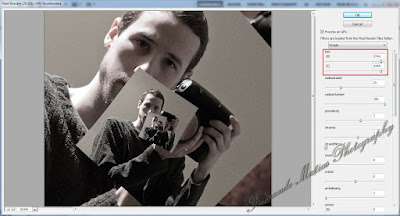
Since we have our transparent section as the inside of our lens, we want to tell the filter that we only have transparency inside. We therefore remove the check mark from the transparentOutside radio. Your photo will get all strange, but don't worry we'll fix that.
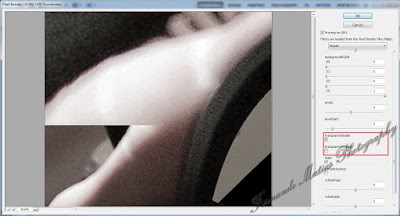
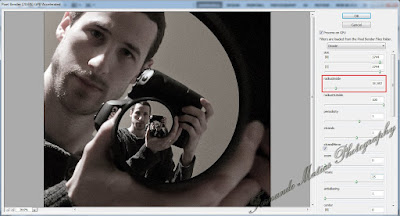
Since our photo is all strange and we cannot see what we are doing, the next adjustment I made was to increase the radiusInside until the photo was somewhat visible. This is just so that you can see what you are doing, and we'll have to modify this again in a few steps.
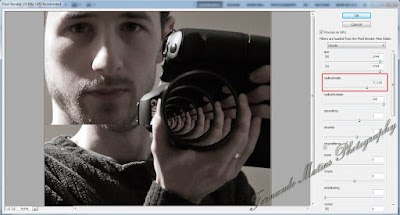
I then adjust the centerShift until my transparent section is in the middle of my shot. I find this makes it easier to get the effect I want, which is a tunneling type effect.
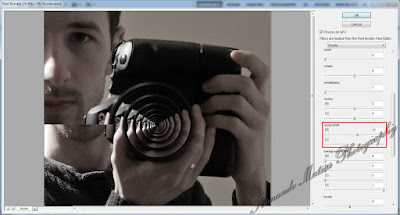
Now that we have our cut out section in the middle of our shot, we then go back to the radiusInside adjustment and actually bring it way back until we get the effect we are going for.
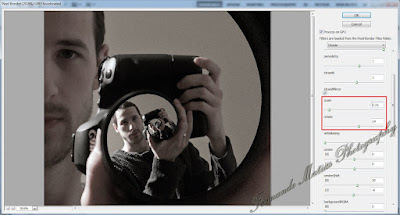
I did not like my face being on an angle like that in the foreground, so I then adjusted the rotation and zoom so that I could get just half of my face directly on the left side.
Now that I was satisfied with the effect, it's just a simple matter of clicking OK, flattening the layers, and saving the file. There we have it, a Self Portrait Droste Style!

This is just one of the many many things this fine add-on can do, and by playing around with the sliders you can get some amazing effects. It is also very useful if you like to make fractals! Just play with each setting individually and you will quickly learn what they do. Enjoy!
Saturday, February 5, 2011
Panoramas
There are two shots for today's "Photo a Day" project, both of which are Panoramas. The first is called Ottawa River Nights Panorama
Exif Data
Camera: Canon Digital Rebel XTi
Apertures: f/10.0
Exposures: 20sec
Focal Lengths: 17mm
Flash: Not-Fired
ISO: 100
Tripod
5 Exposures
Post processing included photomerge, noise reduction, healing tool, and unsharp-mask
The second shot is called Winterlude Opening Ceremony Fireworks Panorama
Exif Data
Camera: Canon Digital Rebel XTi
Apertures: f/7.1
Exposures: 3.2sec
Focal Lengths: 17mm
Flash: Not-Fired
ISO: 100
Tripod
2 Exposures
Post processing included photomerge, noise reduction, healing tool, and unsharp-mask
Exif Data
Camera: Canon Digital Rebel XTi
Apertures: f/10.0
Exposures: 20sec
Focal Lengths: 17mm
Flash: Not-Fired
ISO: 100
Tripod
5 Exposures
Post processing included photomerge, noise reduction, healing tool, and unsharp-mask
The second shot is called Winterlude Opening Ceremony Fireworks Panorama
Exif Data
Camera: Canon Digital Rebel XTi
Apertures: f/7.1
Exposures: 3.2sec
Focal Lengths: 17mm
Flash: Not-Fired
ISO: 100
Tripod
2 Exposures
Post processing included photomerge, noise reduction, healing tool, and unsharp-mask
Friday, February 4, 2011
Morning Sunrise HDR
Today's shot for the "Photo a Day" project is called Morning Sunrise HDR
Exif Data
Camera: Canon Digital Rebel XTi
Aperture: f/4.0
3 Exposures: 1/60 1/125 1/250
Focal Length: 17mm
Flash: Not-Fired
ISO: 200
Post processing included merge to HDR, noise removal, contrast adjustment, healing tool, and unsharp-mask
Exif Data
Camera: Canon Digital Rebel XTi
Aperture: f/4.0
3 Exposures: 1/60 1/125 1/250
Focal Length: 17mm
Flash: Not-Fired
ISO: 200
Post processing included merge to HDR, noise removal, contrast adjustment, healing tool, and unsharp-mask
Thursday, February 3, 2011
Contest Winner!
I just won a contest that was going on over at Quotidian Photography, where I get to choose any 3 of her shots from 2010 and receive them as 8x10 prints. I found Jessica's blog a few years ago, around the same time that I started mine, and I have been following her work ever since. It's interesting to watch as a photographer grows into their own style and technique. She has some fantastic photos, so it's going to be hard to choose just 3.
I thought this was a great idea, and I should also be hosting a similar contest here soon, but for now I just wanted to say thanks to Jessica for my winnings!
Stoped At The Red Light
Wednesday, February 2, 2011
Snowy Fence
Tuesday, February 1, 2011
Lights, Camera, Action!
Subscribe to:
Posts (Atom)