Welcome

Welcome to my photoblog. I try to keep it updated daily with a new photo from either my personal or professional life. It is not intended to be taken as my professional portfolio (please visit the main website for that), but instead it is more of an informal and fun way for me to share some of my personality and creativity with you. Many of the photos on my blog are available for purchase as fine art prints, please visit the main website and/or contact me if you are interested. Enjoy!

Wednesday, July 10, 2013

Great Blue Heron

  
I've always been a bit of a birding kind of guy. I tend to notice them and point them out to my daughter or anyone nearby. It was one of the main reasons why a few years ago I bought my 2X teleconverter to make my Canon 70-200mm f2.8 IS lens into a 140-400mm f5.6 lens. The 400mm zoom really helps fill the frame without needing to get so close that you scare them away, and although you do loose two stops of light (f2.8 becomes f5.6) I find that the depth of field at 400mm is so thin that it's best to stop down to about f8 or f10 anyway. The teleconverter does also add much more noticeable chromatic aberrations and the shots tend to come out a little softer then without it, but from a cost benefit perspective (since I already had the 70-200 f2.8 lens) getting the Canon 2X II Extender was a no brainer compared to dishing out big bucks for a dedicated 400mm lens. These two wildlife shots of a Great Blue Heron were taken with this lens combo on the Ottawa River very recently. What a lovely bird.

Exif Data
Camera: Canon 5D mkII
Aperture: f/8.0
Exposure: 1/2000, 1/2500
Focal Length: 200mm with 2X TC (400mm)
Flash: Not-Fired
ISO: 640
Post processing included conversion from RAW, levels adjustment, and high pass filter


Like this shot? Why not order a print of it

Saturday, July 6, 2013

Locked Up

  
I love these types of photos because it showcases the little things in life. The stuff you probably walk by every day but have never even noticed. Whether it's during a hired event or just on my typical photowalk I am always on the lookout for the little details around us. Not only do they have a simple beauty, but they can be a powerful reminder of how many little details in life we don't tend to see. This one was found on a more recent walk, and it's called Locked Up

Exif Data
Camera: Canon 5D mkII
Aperture: f/1.6
Exposure: 1/640
Focal Length: 85mm
Flash: Not-Fired
ISO: 50
Post processing included conversion from RAW, levels adjustment, and unsharp-mask


Like this shot? Why not order a print of it

Friday, June 28, 2013

Cherry Blossoms

  
I've always loved these trees because of all the beautiful blossoms it gives every year. The problem is all the little red "cherries" that fall at the end of the year and cover the place. This was taken earlier this spring while everything was in bloom.

Exif Data
Camera: Canon 5D mkII
Aperture: f/1.6
Exposure: 1/2000
Focal Length: 85mm
Flash: Not-Fired
ISO: 50
Post processing included conversion from RAW, and unsharp-mask


Like this shot? Why not order a print of it

Tuesday, June 25, 2013

Cold, Wet and Alone

  
It's been a while since I've posted anything new, but I do have a quick shot for today called Cold, Wet and Alone. It was taken a few weeks ago, before this nice heat wave we're having. Yes, I said nice! I'll take the heat over the cold any day! Anyway, it may have been a cold day when I took this but the lighting was so nice with all the rain clouds, and all the rain was making the grass so lush and green!

Exif Data
Camera: Canon 5D mkII
Aperture: f/1.4
Exposure: 1/2500
Focal Length: 50mm
Flash: Not-Fired
ISO: 320
Post processing included conversion from RAW, rotation adjustment, levels adjustment, and contrast adjustment


Like this shot? Why not order a print of it

Friday, May 31, 2013

Family Photos Explained

  
Last week I had some time to go out with the family to take a few photos by Dows Lake with what was left of the tulips. It was late in the evening with a setting sun casting a wonderful golden light on us and the surroundings. This of course is the golden hour for photography, and the best kind of light for portraits and landscape photography. It is my preferred time of day to shoot in, but of course you need to know how to use it to your advantage and how to balance the light on your subject and the background. So I thought I would write up this post to explain how I handled the light with the two examples below.

In this first shot I wanted to get the tulips in the background to give me some colour, but I wanted them out of focus so that your eye is instantly drawn towards the subject, my daughter. Using my 85mm f/1.2 lens I could have completely opened up the aperture (f/1.2) to really blur the background (see my aperture tutorial for more info on how this works) but since I was fairly close to her I knew that if I did that very little of my daughter would be in focus as well. I therefore decided to stop down to f/3.5 since in my experience with that lens it gives me a suitable amount of depth of field, while still producing a very pleasing bokeh (blurred background). With my subject standing in open shade there was still a decent amount of light available so that I used ISO 100 to give me the cleanest photo with no grain, while still giving me fast enough shutter speeds. With aperture and ISO settings selected I metered the background to give me a correct exposure shutter speed value of 1/320th sec. To provide a bit more contrast in the subject's face I also setup an off camera flash in high-speed sync mode to the my left, which was in the same direction of the indirect sunlight. To match the colour of the setting sun and warm up the colour of the flash I covered it with a 3/4 CTO gel, and set my camera's white balance to 4600K to keep some of the warm orange tones. Other than converting the camera output from RAW to jpg, this shot is basically straight out of the camera with no added post processing.

Exif Data
Camera: Canon 5D mkII
Aperture: f/3.5
Exposure: 1/320
Focal Length: 85mm
Flash: Fired off camera
ISO: 100
Post processing included conversion from RAW


The second shot has a somewhat similar setup. I needed more depth of field since there are three people in the shot, so I stopped down to f/5.0 giving me a very sharp focus for all the girls, yet still slightly blurring the background. The sun in this shot was coming in from behind the subjects giving a very nice rim lighting, so I needed to expose for the background (shutter speed of 1/320 @ 100 ISO) and use my flash to bring the girls back from becoming silhouettes. The flash was setup on my right, and I again used a 3/4 CTO gel to match the golden sunset colour and high-speed sync. White balance was again set to 4600K to keep some of those warm tones. Other than converting the camera output from RAW to jpg, this shot is also basically straight out of the camera with no added post processing.

Exif Data
Camera: Canon 5D mkII
Aperture: f/5.0
Exposure: 1/320
Focal Length: 85mm
Flash: Fired off camera
ISO: 100
Post processing included conversion from RAW

Wednesday, May 1, 2013

Daffodils Timelapse Video

  
Just a quick little timelapse photography video I did of two daffodils opening. I used my old Canon XTi that was modified to use the 400plus firmware which has a built in intervalometer. I photos at 2 minute intervals for a total of 82 shots. Play it in 1080p full HD glory and enjoy this timelapse video!


Exif Data
Camera: Canon Digital Rebel XTi
Aperture: f/10.0
Exposure: 1/50
Focal Length: 41mm
Flash: Not-Fired
ISO: 200
Post processing included batch exposure adjustments, cropped 16x9, create timelapse video @ 15fps

Monday, April 29, 2013

Spaghetti and Meatballs

  
Yum, Spaghetti and Meatballs! Tasted as good as it looks.

Exif Data
Camera: Canon 5D mkII
Aperture: f/7.1
Exposure: 1/200
Focal Length: 84mm
Flash: Fired off camera (E-TTL)
ISO: 320
Flash Umbrella
Post processing included conversion from RAW, and unsharp-mask

Sunday, April 21, 2013

Bubbles

  
A very interesting latticework of bubbles. View it in big to really see all the detail.

Exif Data
Camera: Canon 5D mkII
Aperture: f/16.0
Exposure: 1/160
Focal Length: 50mm
Extension Tube: 20mm
Flash: Fired off camera (E-TTL)
ISO: 400
Flash Cord
Post processing included conversion from RAW, converted to black and white, levels adjustment, contrast adjustment, high pass filter, and cropped


Like this shot? Why not order a print of it

Friday, April 12, 2013

Yongnuo YN-622c Wireless TTL Flash Triggers - Review

  
A few weeks ago I bought a set of Yongnuo’s YN-622c wireless TTL flash triggers to use my flashes off camera using 2.4GHz radio signals while maintaining Canon’s E-TTL capabilities. In the past I have either used an E-TTL flash cord, or Canon’s infrared wireless transmission systems to trigger off camera flashes, but these new radio transmitters will work with my existing equipment, provide me with further range, and they do not require line of sight so I’ll have much more versatility in flash placement without any worries if they will go off! At least that was the thinking before purchase, so did the Yongnuo YN-622c’s deliver on that promise? The quick answer is YES, but read on for more information on the PRO’s and CON’s of this system.

While I was researching radio flash triggers I knew that my choices were going to be limited since I insisted on keeping Canon’s E-TTL capabilities. Yes, manual flash settings are usually the way to go to make sure you get the exact amount of light you want, but during weddings and events where the subject is constantly on the move E-TTL is a must, and just as good if you know how to use it to your advantage. There are very few radio triggers on the market that can do TTL, and the technology to do so is still somewhat in its infancy. The pocketwizard solution was fairly expensive, and it has interference problems with one of my flashes (580EXII). The pixel kings were in the right price range, but at the time they did not have all of the E-TTL features available that I regularly use (ratios!). So once I found out about the Yongnuo YN-622c I was intrigued and hoped that it would really provide everything it claimed. My first mission was to find a reputable realtor to buy a set since these triggers are not widely available in your local camera store and only obtainable online from Hong Kong. I decided on purchasing my first set direct from Yongnuo’s ebay store and was pleasantly surprised that they arrived at my door in exactly 1 week from order date! I was so impressed with the shipping time, communication with the seller, and first impressions of the product that I ordered another set that night! This second set took over 3 weeks to arrive at my door so shipping times may vary, but in the end I think ordering direct from Yongnuo was still a fairly positive experience.


Yongnuo YN-622c wireless E-TTL flash triggers

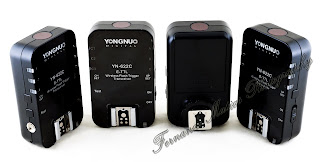
My first impressions of the product itself were quite positive all around. They arrived in a simple package that contained the bare minimum, a box containing two transceivers in bubble wrap bags, a quick guide, and a manual. It would have been nice if they also came with storage bags and/or PC sync chords, but they can easily be purchased separately if needed anyway. They are sturdy and feel rugged enough for everyday use and do not feel like they are going to fall apart anytime soon. The hotshoe base is made of metal which makes them feel very solid when engaged on top of the camera. The locking mechanism is the basic screw holder variety which works well; however, it would have been nice to have some sort of weather sealing. Of course that’s just a pipe dream for something in this price range! Each transceiver is both a receiver and transmitter so if one does die you essentially have a backup for each type as long as you have more than 2 of these. They use regular AA batteries which are always easy to find anywhere when needed, and there is an on/off switch so you can be sure your batteries are not going to be dead from unintended use when you pull these out of your camera bag.

Yongnuo YN-622c wireless E-TTL flash triggers

There are no LCD screens on the units themselves and only three buttons on the sides, but this is because all of the settings are actually done in your own on camera menu system if you are using a Class A camera body (which is basically anything new since the days of the XSi). I thought this was absolutely an ingenious way of adjusting the settings; since it’s already found in the camera itself why bother reinventing the wheel! The information is then transmitted to the receivers by the transmitter on the camera, so there is no need to access your flashes once you have them set up! The three buttons (Test, CH Set, GP Set) will allow you to quickly change the channel, group, or fire a test flash, but basically everything else is done in the camera’s own menu system. The only problem I have with the buttons is that it is somewhat easy to accidentally press them when turning the system on. There is also a PC Sync port on the device which could benefit those who use studio strobes. The front of the transmitter has a focus assist laser, which in all honesty is not very good. It works fairly well if your subject is far enough from the camera and does accurately aid in focusing, but once the subject is within a few feet the alignment is off making the light pattern way too high and does not cover most of the focus points, not even the center point! This makes it useless in close range.

After using these for a few weeks now I can safely say that the Yongnuo YN-622c really does deliver on its claim to fully implement Canon’s E-TTL system and all of the modern flash features using wireless radio signals. Using the menu system you can switch between E-TTL (both Evaluative and Average), Manual, and Multi-Flash Stroboscopic modes. Yes, it's the best of both worlds with E-TTL or Manual settings if you choose! You can even setup the transceivers to work in a mixed mode where you can mix multiple E-TTL and manual flashes at the same time! 1st curtain, 2nd curtain (only if wireless is disabled) and Hi-speed sync (HSS) modes are all available. Flash Exposure Bracketing (FEB) is possible in a range from -6 to +6EV, while Flash Exposure Compensation (FEC) can be used from -3 to +3EV but will also add any on-flash settings for the possibility of more. Most importantly for me is that group ratios are available for use in both E-TTL and manual wireless modes. Either way all three firing groups are available (A+B+C, A:B and A:B C) and easily controlled in the camera menu system with no need to access the flash units themselves other than the initial group selection on the transceiver during setup. The best part of this system, and the main reason I bought them, is that it does all this using 2.4Ghz radio signals instead of Canon’s Infrared wireless system. The major benefit of this is that I no longer require line of sight and can place my flashes anywhere, even behind walls if I want to! The signal range has not disappointed and has worked flawlessly even behind walls or in awkward out of sight locations. This has not only increased the possibilities of getting more creative with my flash placement, but has also removed any worry about me stepping out of line of sight of the secondary flashes and having them not go off for a string of shots during a more hectic shoot such as a wedding.

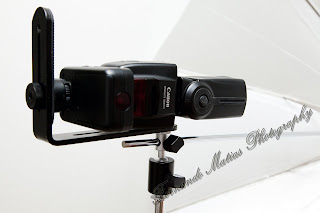
A minor problem I knew would happen once I put these into my current setup is that the added height of the transmitter under my flash would throw off the alignment of my flash and my flash umbrella. The added height would raise the flashes area of coverage from the center of the umbrella reducing its effectiveness as a diffuser. However, this was easily corrected by the purchase of an L-bracket which actually aligned my flash even better than I had it before.

L-bracket flash setup for umbrella holder

The only issue I was unaware of and only identified after purchase was that the YN-622c’s will incorrectly completely overexpose the photo if you use a pre-flash when you combine a Canon 5D mkII with a Canon 580EXII off camera and have wireless mode disabled. For some reason this only happens in this exact combination, as I have tested several other camera bodies (Canon 1DX, T3i, XTi) and flashes (Canon 600EX-RT, 420EX) with no problems. To make sure this was always the case I used two different Canon 5D mkII’s and Canon 580EXII’s, and with any combination of these it always miss fired. I also tried different sets of YN-622c’s with no change. Although this could be an issue for some, I found that for my work it would not since in most cases I would have wireless enabled anyway which resolves the problem. This problem is also resolved as soon as another acceptable flash is introduced into the mix such as having a Canon 420EX also off camera. Since most of the time I use more than one flash, and have wireless enabled, this problem for me is technically a non-issue.

So if you are looking to set up your game and go to off camera lighting with E-TTL without the worry of having line of sight then the Yongnuo YN-622c transceivers is a great system if you already have some flashes in your kit and do not want to spend big money on the new Canon 600EX-RT’s.

Thursday, April 11, 2013

Five Months

  
It's been five months since I have posted anything on the blog, but don't worry I'm still here! Things have been fairly hectic with the new addition to the family and with work so I have not had as much time to post any recent photos. I have still been taking the time to shoot something most days, just not enough time to process or put them up here, and well.. most of the photos I have been taking are of the kids of course! I am getting back to keeping my blog updated more regularly now, however, it may not be a photo-a-day just yet. I am leaning more towards a photo or two a week and hoping to get more technical info, photo advice, product reviews, recent work, etc. on here as well. So enjoy the following shot of my little one, and stay tuned for a rundown on a recent photography purchase!

Exif Data
Camera: Canon 5D mkII
Aperture: f/5.6
Exposure: 1/200
Focal Length: 200mm
Flashes: Fired off-camera with YN-622c
ISO: 400
Flash Umbrella
Post processing included conversion from RAW, cropped, dodge/burn, selective sharpening, selective softening