Finding The "Right" Photographer For Your Wedding
Many people often wonder: how do I find a photojournalistic wedding photographer who is professional, friendly, and talented at capturing moments. Sometimes more importantly, how do I find such a wedding photographer who has rates that are reasonable? The great news is that Fernando Matias Photography is a company operated by a professional photographer who specializes in wedding photography within the Ottawa area, and is ready to help you address these questions.
Speaking from experience, most people ultimately find a wedding photographer from a direct referral. In other words, people talk to others who have recently hired a wedding photographer and are provided with information that they then use to figure out who to hire for their needs. This is a great way to go, and in fact most of our business is obtained through direct referrals from previous clients. However, the Internet has now also changed this. You now have the power to find a professional photographer who specializes in Ottawa wedding photography by a simple web search. If you have not been directly referred to us by a previous happy customer already, we at Fernando Matias Photography would be happy to provide you with past testimonials from clients who can vouch for our passion and quality.
Experience Matters
There are several things you will want to keep in mind prior to making a decision. First, you will want to make sure that the photographer you are considering has been proven in the past. Your photographer should have a portfolio that you can browse, both in person and online. In addition, it's also important to find someone who specializes in wedding photography in your area. Capturing moments in the city that look just right is a skill that is acquired over time, and knowing which locations work and which do not will save you valuable time on an already overwhelmingly busy day. You want the very best wedding photographer for that special day in your life. Sure, the bottom line is important and wedding budgets are made for a reason. However, budget accordingly and remember that your wedding day photographs are memories that you want to last a lifetime. You won’t have another opportunity for these photos to be taken and cutting back on your photography funds can end up hurting you in the end.
The Bottom Line
The bottom line should be "Is this the right photographer for us?" and although the cost is important, it should not be your only point of reference when comparing photographers. A quick search will show that there is a huge range in wedding photography rates, from dirt cheap all the way to the insanely expensive. In most cases the photographer's rate is directly related to how much experience they have, and therefore a photographer that gives you a questionably low quote is usually very inexperienced and/or they will not give your wedding the attention it deserves. At Fernando Matias Photography we have limits on how many events we will accept in any given month so that we can be sure to provide 100% of our attention to your event.
Style
It is also important to speak with the photographer to make sure that your vision of the special day matches what the photographer is able to provide. Each photographer has their own style, and essentially this style is what you are hiring them for. If a photographer shoots entirely in black and white, and you want a mix of colour and monotone shots in your images then maybe they are not the right photographer for you. Find a photographer whose style matches your needs and then you’ll be assured that you get the photos you want. At Fernando Matias Photography our style is more photojournalistic with a strong emphasis on all the little details, and also plenty of candids. We know that posed photos are also an important part of your day for group photos and more formal shots of the newlyweds, and we'll not only do our best to show you how to pose so that you look your best but we also make formal photos fun!
Two Photographers Are Better Than One
There are many benefits to hiring two photographers for your wedding day. A single photographer can only be in one place at any given time and if you want photos of both the bride and groom getting ready it is very rare that they will both be in the same place at the same time. With two photographers one can dedicate their time to be with the bride as she is getting ready, while the other can focus on the groom. A single photographer will likely need to drive back and forth and miss once in a lifetime moments in your special day. If a photographer does offer you a second shooter, make sure that this person is also another professional photographer and not just an assistant or student. It is for these reasons and more that at Fernando Matias Photography our full day wedding packages provide two professional photographers to cover all of your wedding moments, the second being from Jeffrey Meyer Photography.
Communication
Communication between you and the photographer is very important for a successful day. You should always be able to contact your photographer and have your questions addressed quickly. The great news about working with a professional photographer from Fernando Matias Photography is that you will have your questions answered in a timely manner. This is important because once you make a decision as to which photographer to use, you don't want to find yourself constantly waiting to get answers to your important questions.
Contracts
The photographer you choose should provide you with a signed contract. This contract not only protects the photographer, but will also give you, the client, the security you need to make sure you obtain everything you were promised and in a timely fashion. The contract should stipulate exactly what you are required to pay in total, as well as exactly what you will receive for this fee. It is for these reasons, and many more, that at Fernando Matias Photography we always provide a full contract for every job we do.
Is Fernando Matias Photography the right photographer for you? Only you can decide, but we will do everything we can to earn your business. Do you have any comments or questions regarding what to look for in a wedding photographer? Feel free to ask us using the comments section below or by emailing us directly using our contact page and we will give you a frank and open answer.

Showing posts with label Learning. Show all posts
Showing posts with label Learning. Show all posts
Tuesday, March 13, 2012
Monday, March 12, 2012
Hippos - Depth of Field Tutorial
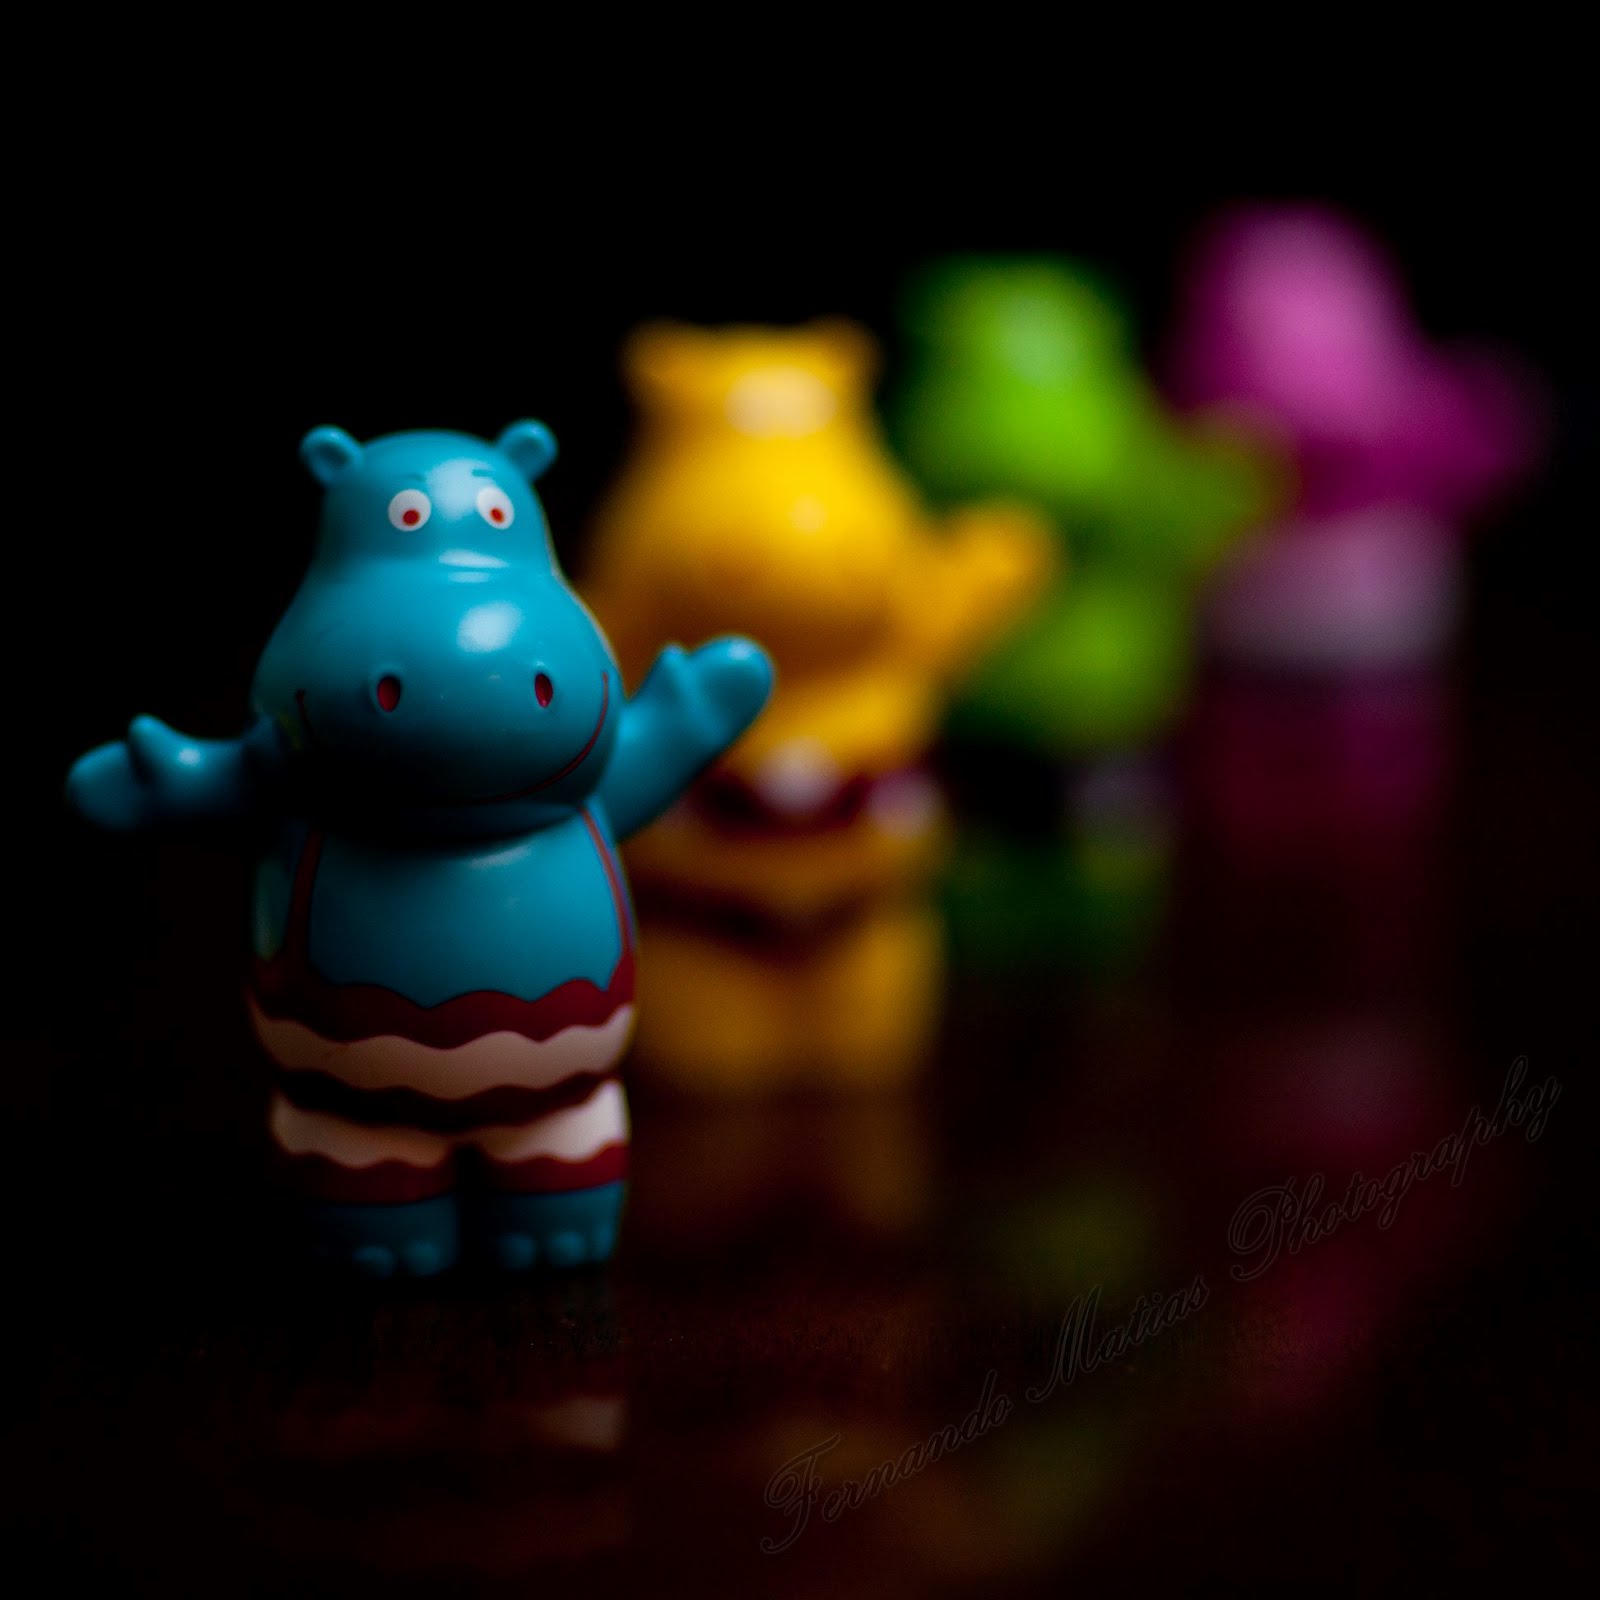
Today's shots for the "Photo a Day" project are called Hippos, and I'll be using them to explain a photography term called Depth Of Field.


Whenever people find out that I am a photographer, usually their first question is "What camera should I buy?". I'm not going to answer that question today, but rather I'll try to shed some light on two of the other more popular questions "How do I make my shot's background all blurry?" and "How do I get everything in my shot in focus?".
One simple answer to both questions has to do with Depth of Field (DOF), and we can control the DOF with the camera's aperture setting. The aperture is a diaphragm (think of it as a hole) within the lens that opens and closes to various sizes to let more or less light through to the camera's sensor. Because of some light physics that I am not going to explain here, the aperture also affects the DOF in that a smaller aperture (hole) gives you more DOF (more in focus) and a larger aperture gives you less DOF (more blur).

Lens aperture values are denoted by a "f/" followed by a number (eg. f/2.8). You may have noticed this in my Exif info that I post for each photo of the day. In a slightly strange backwards kind of way, a large aperture (large hole) has a small f/ number, and the number gets bigger as you get a smaller aperture (smaller hole). You can see some examples of this in the figure above. Using the maximum aperture on your lens is called shooting wide open. That is when you have your aperture fully open to let in the most light it can, and it will also produce the least DOF (blurry background). Closing the aperture on the lens is known as stopping down the lens and it will increase the DOF but at a cost of reducing the amount of light.
As you can see in my example Hippo shots above, when you shoot wide open with an aperture of f/1.2 (first shot) you get a very shallow DOF where only the blue hippo's nose is in focus and even his eyes are slightly out of focus. All the other hippos are a complete blur! As you increase the aperture value (f/3.5, second shot) you are decreasing the size of the hole it creates, and you are increasing the DOF to now include the entire blue hippo, but the other hippos are still blurry. Increasing the aperture even more to f/7.1 (third shot) starts to bring the yellow hippo into focus, but it takes a very small hole (f/16.0, fourth shot) to really bring almost all of the hippos into focus.
There are of course other factors that will affect this such as focal length (zoom) and how close you are to the subject. To keep this brief I'll just say this: The longer the focal length (more zoom) the smaller your DOF will be, the wider your focal length (wide angle) the more DOF; The closer you are to the subject the smaller your DOF, and the further from the subject the greater the DOF.
So the next time you want a blurry background just remember to use your maximum aperture (smallest f/ number), and when you want everything in focus use a smaller aperture (largest f/ number).
Do you have any comments or questions about this? Feel free to ask us using the comments section below or by emailing us directly using our contact page.
Exif Data
Camera: Canon 5D mkII
Aperture: f/1.2, 3.5, 7.1, 16.0
Exposure: 1/200
Focal Length: 85mm
Flash: Fired Off Camera E-TTL
ISO: 800
Flash Cord
Tripods
Post processing included conversion from RAW, and cropped
Aperture Diagram borrowed from: http://petphotographytips.wordpress.com/2011/05/24/what-is-an-fstop/


Whenever people find out that I am a photographer, usually their first question is "What camera should I buy?". I'm not going to answer that question today, but rather I'll try to shed some light on two of the other more popular questions "How do I make my shot's background all blurry?" and "How do I get everything in my shot in focus?".
One simple answer to both questions has to do with Depth of Field (DOF), and we can control the DOF with the camera's aperture setting. The aperture is a diaphragm (think of it as a hole) within the lens that opens and closes to various sizes to let more or less light through to the camera's sensor. Because of some light physics that I am not going to explain here, the aperture also affects the DOF in that a smaller aperture (hole) gives you more DOF (more in focus) and a larger aperture gives you less DOF (more blur).

Lens aperture values are denoted by a "f/" followed by a number (eg. f/2.8). You may have noticed this in my Exif info that I post for each photo of the day. In a slightly strange backwards kind of way, a large aperture (large hole) has a small f/ number, and the number gets bigger as you get a smaller aperture (smaller hole). You can see some examples of this in the figure above. Using the maximum aperture on your lens is called shooting wide open. That is when you have your aperture fully open to let in the most light it can, and it will also produce the least DOF (blurry background). Closing the aperture on the lens is known as stopping down the lens and it will increase the DOF but at a cost of reducing the amount of light.
As you can see in my example Hippo shots above, when you shoot wide open with an aperture of f/1.2 (first shot) you get a very shallow DOF where only the blue hippo's nose is in focus and even his eyes are slightly out of focus. All the other hippos are a complete blur! As you increase the aperture value (f/3.5, second shot) you are decreasing the size of the hole it creates, and you are increasing the DOF to now include the entire blue hippo, but the other hippos are still blurry. Increasing the aperture even more to f/7.1 (third shot) starts to bring the yellow hippo into focus, but it takes a very small hole (f/16.0, fourth shot) to really bring almost all of the hippos into focus.
There are of course other factors that will affect this such as focal length (zoom) and how close you are to the subject. To keep this brief I'll just say this: The longer the focal length (more zoom) the smaller your DOF will be, the wider your focal length (wide angle) the more DOF; The closer you are to the subject the smaller your DOF, and the further from the subject the greater the DOF.
So the next time you want a blurry background just remember to use your maximum aperture (smallest f/ number), and when you want everything in focus use a smaller aperture (largest f/ number).
Do you have any comments or questions about this? Feel free to ask us using the comments section below or by emailing us directly using our contact page.
Exif Data
Camera: Canon 5D mkII
Aperture: f/1.2, 3.5, 7.1, 16.0
Exposure: 1/200
Focal Length: 85mm
Flash: Fired Off Camera E-TTL
ISO: 800
Flash Cord
Tripods
Post processing included conversion from RAW, and cropped
Aperture Diagram borrowed from: http://petphotographytips.wordpress.com/2011/05/24/what-is-an-fstop/
Sunday, February 6, 2011
How I Did It: Self Portrait Droste Style - Tutorial
I had a few people ask me how I made my Self Portrait Droste Style a few days ago, so I thought I would write a quick little tutorial.
The Droste effect is a special plugin for Photoshop. There may also be plugins for free programs such as Gimp, however since I used Photoshop to make mine, so this tutorial will only show you the way to do it using this method. Obviously, Photoshop CS4 or CS5 is required to use this tutorial. You will also need the free Adobe Pixel Bender Plug-in and the free Droste Effect add-on for pixel bender. Install the pixel bender plug-in as usual, and just unzip the Droste effect add-on .pbk file into your Program Files\Adobe\Adobe Photoshop CS5\Pixel Bender Files\ folder (for 64bit windows use Program Files\Adobe\Adobe Photoshop CS5 (64 bit)\Pixel Bender Files\).
Now that we have everything ready to go to edit your file, what we need now is a self portrait.
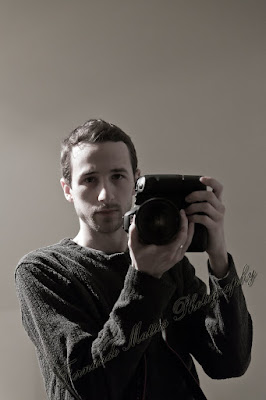
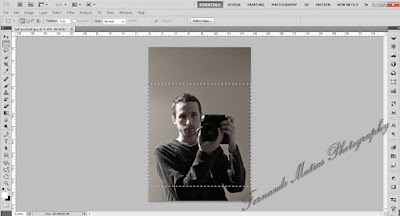
Great! Now that we have a shot we want to use, we load it up in Photoshop and the first thing we do is make a perfect square (hold shift) over the area we would like to use with the marquee tool, and copy the selection (ctrl-c).
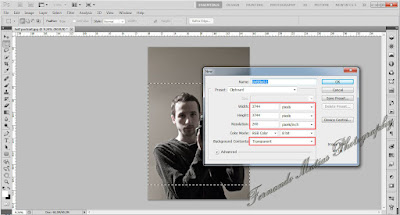
We then create a new transparent background document, using the exact dimensions of the squared selection. In my case those values were 3744 x 3744px at 240dpi.
We then paste our copied selection into our new document (ctrl-p), and in this case I wanted the Droste effect to come from the inside portion of my camera lens so using the circular marquee tool I cut out the inside of my lens revealing the transparent background.
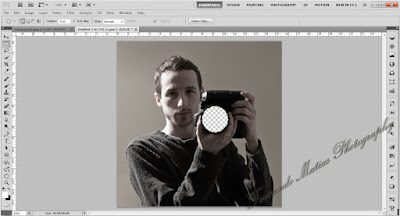
We can now go ahead and load up the Droste plugin filter (Filter/Pixel Bender/Pixel Bender Gallery). After selecting Droste from the drop down menu, the first thing we have to do is set the size to the same dimensions as our file (3744x3744).
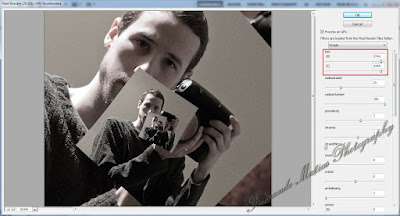
Since we have our transparent section as the inside of our lens, we want to tell the filter that we only have transparency inside. We therefore remove the check mark from the transparentOutside radio. Your photo will get all strange, but don't worry we'll fix that.
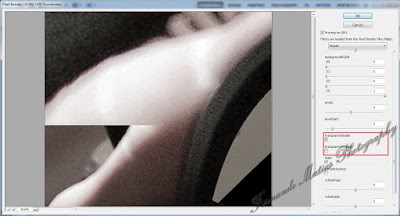
Since our photo is all strange and we cannot see what we are doing, the next adjustment I made was to increase the radiusInside until the photo was somewhat visible. This is just so that you can see what you are doing, and we'll have to modify this again in a few steps.
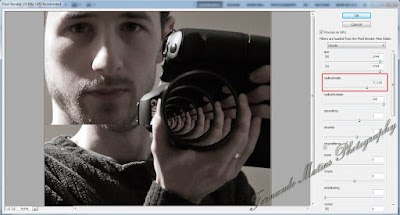
I then adjust the centerShift until my transparent section is in the middle of my shot. I find this makes it easier to get the effect I want, which is a tunneling type effect.
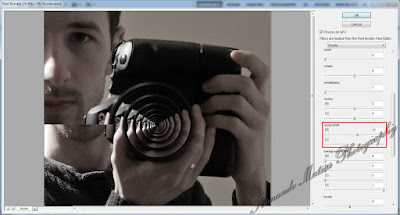
Now that we have our cut out section in the middle of our shot, we then go back to the radiusInside adjustment and actually bring it way back until we get the effect we are going for.
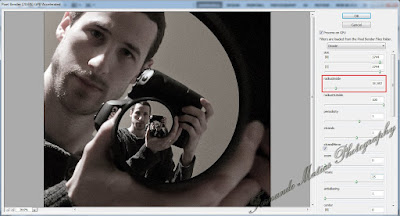
I did not like my face being on an angle like that in the foreground, so I then adjusted the rotation and zoom so that I could get just half of my face directly on the left side.
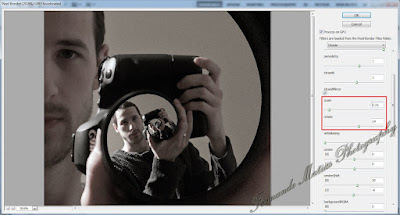
Now that I was satisfied with the effect, it's just a simple matter of clicking OK, flattening the layers, and saving the file. There we have it, a Self Portrait Droste Style!
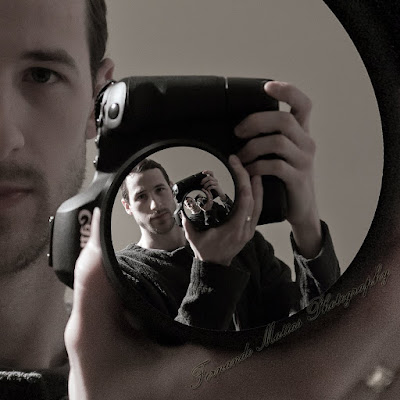
This is just one of the many many things this fine add-on can do, and by playing around with the sliders you can get some amazing effects. It is also very useful if you like to make fractals! Just play with each setting individually and you will quickly learn what they do. Enjoy!
The Droste effect is a special plugin for Photoshop. There may also be plugins for free programs such as Gimp, however since I used Photoshop to make mine, so this tutorial will only show you the way to do it using this method. Obviously, Photoshop CS4 or CS5 is required to use this tutorial. You will also need the free Adobe Pixel Bender Plug-in and the free Droste Effect add-on for pixel bender. Install the pixel bender plug-in as usual, and just unzip the Droste effect add-on .pbk file into your Program Files\Adobe\Adobe Photoshop CS5\Pixel Bender Files\ folder (for 64bit windows use Program Files\Adobe\Adobe Photoshop CS5 (64 bit)\Pixel Bender Files\).
Now that we have everything ready to go to edit your file, what we need now is a self portrait.

Great! Now that we have a shot we want to use, we load it up in Photoshop and the first thing we do is make a perfect square (hold shift) over the area we would like to use with the marquee tool, and copy the selection (ctrl-c).

We then create a new transparent background document, using the exact dimensions of the squared selection. In my case those values were 3744 x 3744px at 240dpi.

We then paste our copied selection into our new document (ctrl-p), and in this case I wanted the Droste effect to come from the inside portion of my camera lens so using the circular marquee tool I cut out the inside of my lens revealing the transparent background.

We can now go ahead and load up the Droste plugin filter (Filter/Pixel Bender/Pixel Bender Gallery). After selecting Droste from the drop down menu, the first thing we have to do is set the size to the same dimensions as our file (3744x3744).

Since we have our transparent section as the inside of our lens, we want to tell the filter that we only have transparency inside. We therefore remove the check mark from the transparentOutside radio. Your photo will get all strange, but don't worry we'll fix that.

Since our photo is all strange and we cannot see what we are doing, the next adjustment I made was to increase the radiusInside until the photo was somewhat visible. This is just so that you can see what you are doing, and we'll have to modify this again in a few steps.

I then adjust the centerShift until my transparent section is in the middle of my shot. I find this makes it easier to get the effect I want, which is a tunneling type effect.

Now that we have our cut out section in the middle of our shot, we then go back to the radiusInside adjustment and actually bring it way back until we get the effect we are going for.

I did not like my face being on an angle like that in the foreground, so I then adjusted the rotation and zoom so that I could get just half of my face directly on the left side.

Now that I was satisfied with the effect, it's just a simple matter of clicking OK, flattening the layers, and saving the file. There we have it, a Self Portrait Droste Style!

This is just one of the many many things this fine add-on can do, and by playing around with the sliders you can get some amazing effects. It is also very useful if you like to make fractals! Just play with each setting individually and you will quickly learn what they do. Enjoy!
Friday, December 31, 2010
Got A New Camera? Want To Learn How To Use It?
Did you get a new camera these past holidays? Maybe as a gift, or maybe you went out and got a great deal on boxing day! Either way I am sure you have been excited to take it out and shoot away as often as you can, capturing memories that will last forever. The photography bug is an easy one to catch, and the only way to relieve the itch is by learning as much as you can to better your shots. Whether you are a novice or a seasoned veteran, there is always something you can learn about your camera, or a new technique to explore. A great and informative website that I enjoy contributing to is Digital Photography School. There is a multitude of information on their main website, and even more if you are ready to jump into their forum section. If you are fairly new to photography and/or cameras I would suggest the following compilation as a good place to start: 21 Settings, Techniques and Rules All New Camera Owners Should Know. It's a great collection of useful beginner, intermediate, and experienced information all in one handy link.
Some of the information there can be a bit daunting at first for a beginner. If you prefer I also offer one-on-one photography courses where you can learn whatever is most important to you with hands on instruction. Classes are tailor built to your own photography needs and can range anywhere from complete beginner (Point & Shoot cameras, SLR cameras, Camera settings, Get out of Auto mode) to more involved and experienced photography (Studio gear, Flash photography, HDR, Photoshop tips and tricks). If you are interested, send me an email (fernmatias@gmail.com) to get more info. I can get you on your way to becoming comfortable shooting outside of Auto mode, and moving toward making your shots amazing!
Some of the information there can be a bit daunting at first for a beginner. If you prefer I also offer one-on-one photography courses where you can learn whatever is most important to you with hands on instruction. Classes are tailor built to your own photography needs and can range anywhere from complete beginner (Point & Shoot cameras, SLR cameras, Camera settings, Get out of Auto mode) to more involved and experienced photography (Studio gear, Flash photography, HDR, Photoshop tips and tricks). If you are interested, send me an email (fernmatias@gmail.com) to get more info. I can get you on your way to becoming comfortable shooting outside of Auto mode, and moving toward making your shots amazing!
Tuesday, May 20, 2008
Lines
Today I wanted to briefly try to explain a few uses of lines in photography and composition, along with a few examples. First of all, lines are everywhere! You just need to keep an eye out for them around you and you will start to see them. Lines can be straight (vertical, horizontal, diagonal) or curved and can enhance the depth in a shot. Take this shot for example.

The curved line draws your eye from the bottom of the shot into the middle, and gives you the perception of distance as you follow the railing. Curved lines are generally pleasing to the eye, and create a feeling of flow.
Lines can also give you a sense of grandeur and strength, as in the next two examples.


In both examples the vertical lines give the architecture a feeling of power and height. Also, vertical lines are enhanced simply by shooting vertically rather than horizontally. This emphasizes the lines, and the emotion.
Diagonal lines can work well to direct your eye through the photograph and create points of interest where they intersect.

In this shot the diagonal lines draw your eyes to the subject of the picture. Diagonal lines can also add a dynamic look and sense of action to an image.
Horizontal lines help evoke a sense of stability, width, and calm. Horizons are the most common horizontal lines in photographs.

Unbroken horizons can create dull or uninteresting photos. Try to break things up by putting other shapes in the way. This will create a point of interest.
So keep an eye out for all the different types of lines, and don't forget to combine them and mix them up!

The curved line draws your eye from the bottom of the shot into the middle, and gives you the perception of distance as you follow the railing. Curved lines are generally pleasing to the eye, and create a feeling of flow.
Lines can also give you a sense of grandeur and strength, as in the next two examples.


In both examples the vertical lines give the architecture a feeling of power and height. Also, vertical lines are enhanced simply by shooting vertically rather than horizontally. This emphasizes the lines, and the emotion.
Diagonal lines can work well to direct your eye through the photograph and create points of interest where they intersect.

In this shot the diagonal lines draw your eyes to the subject of the picture. Diagonal lines can also add a dynamic look and sense of action to an image.
Horizontal lines help evoke a sense of stability, width, and calm. Horizons are the most common horizontal lines in photographs.

Unbroken horizons can create dull or uninteresting photos. Try to break things up by putting other shapes in the way. This will create a point of interest.
So keep an eye out for all the different types of lines, and don't forget to combine them and mix them up!
Subscribe to:
Posts (Atom)